The 4 in 1 crib instructions manual provides guidance on assembling and converting the crib into different forms using various tools and parts effectively always․
Overview of the Assembly Process
The assembly process for the 4 in 1 crib involves several steps‚ including assembling the back rail‚ attaching the side rails‚ and installing the mattress support․
The process requires various tools and parts‚ such as bolts‚ screws‚ and Allen wrenches‚ which are provided with the crib or can be purchased separately․
It is essential to follow the instructions carefully to ensure the crib is assembled correctly and safely;
The assembly process may vary depending on the specific model of the crib‚ so it is crucial to refer to the instructions provided with the crib․
The instructions will guide you through the assembly process‚ from preparing the tools and parts to completing the final assembly and inspection․
By following the instructions and taking the necessary precautions‚ you can ensure the crib is assembled safely and correctly‚ providing a comfortable and secure place for your child to sleep․
Preparation for Assembly
Read the instructions carefully and gather all necessary tools and parts before starting the assembly process slowly and carefully always․
Required Tools and Parts
To assemble the 4 in 1 crib‚ you will need various tools and parts‚ including a M4 Allen wrench‚ M6 x 15mm barrel nut‚ and 1/4 x 100 mm bolt․
The tools and parts may vary depending on the model of the crib‚ so it is essential to check the instruction manual for specific requirements․
A list of required tools and parts is usually provided in the instruction manual‚ and it is crucial to gather all the necessary items before starting the assembly process․
The tools and parts should be handled carefully to avoid damage or loss․
By having all the required tools and parts‚ you can ensure a smooth and successful assembly process․
It is also recommended to keep the tools and parts organized and within reach to avoid delays or interruptions․
The instruction manual will guide you through the assembly process‚ and the required tools and parts will be specified in each step․
The assembly process requires attention to detail and careful handling of the tools and parts to ensure the crib is assembled correctly and safely․

Section 1: Crib Assembly
Assembling the crib requires careful attention to detail and following instructions precisely always using correct tools․
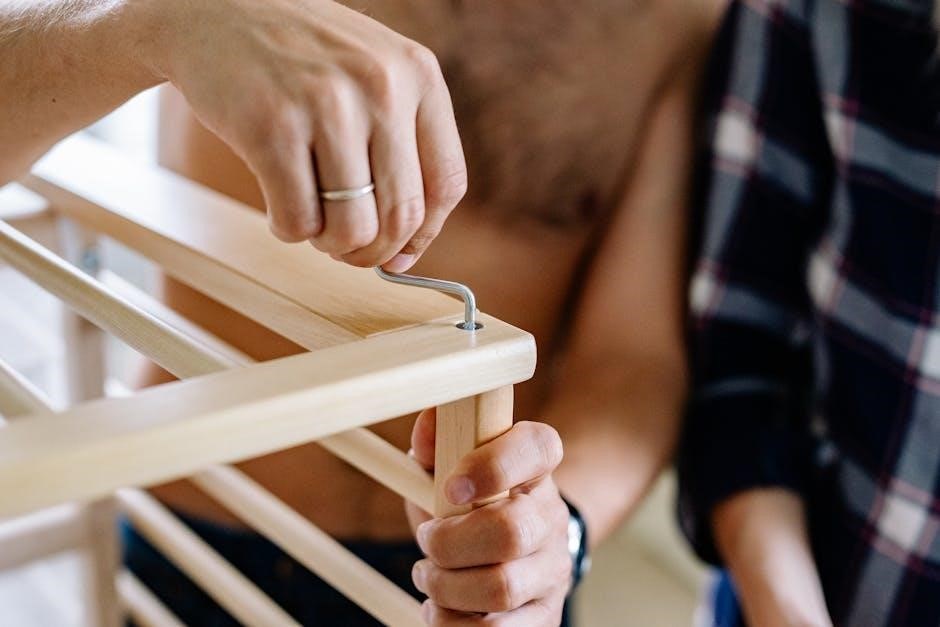
Step 1: Assembling the Back Rail
To assemble the back rail‚ start by gathering the required parts and tools‚ including the back rail‚ bolts‚ and Allen wrench‚ as listed in the instructions manual․
The back rail is a crucial component of the crib‚ providing support and stability to the entire structure․
It is essential to follow the instructions carefully to ensure that the back rail is assembled correctly and securely․
The assembly process involves attaching the back rail to the side rails using the provided bolts and tightening them firmly․
Make sure to tighten the bolts in a clockwise direction until they are snug‚ then loosen them slightly to allow for easy adjustment․
The back rail should be level and securely attached to the side rails to provide a stable foundation for the crib․
By following these steps‚ you can ensure that the back rail is assembled correctly and safely‚ providing a comfortable and secure sleeping environment for your child․

Converting the Crib to a Toddler/Day Bed
Converting the crib involves removing bolts and attaching a guard rail for safety and support always using correct tools․
Step 1: Removing Bolts
To begin converting the crib‚ start by removing the bolts that hold the crib together‚ taking care not to strip the screws․
Use an Allen wrench to loosen the bolts‚ then completely remove them from the crib frame․
Make sure to set the bolts aside in a safe place where they will not get lost․
It is essential to follow the instructions carefully to ensure a successful conversion․
The removal of bolts is a crucial step in the conversion process‚ and it requires attention to detail․
By following the instructions‚ you can ensure that the conversion is done safely and correctly․
The crib’s instructions manual provides guidance on the correct tools to use and the steps to follow․
Always refer to the manual for specific instructions on removing bolts and converting the crib․
The process may vary depending on the crib model‚ so it is crucial to follow the instructions provided․

Additional Assembly Steps
Follow the assembly instructions for footboard and other parts carefully and accurately always using correct tools․
Footboard Assembly
To assemble the footboard‚ start by identifying the required parts and tools‚ including the footboard panel‚ bolts‚ and Allen wrench․
The footboard assembly process involves attaching the footboard panel to the crib frame using the provided bolts and nuts․
Ensure that all bolts are tightened securely to prevent any loose connections․
The assembly instructions provided with the crib should be followed carefully to ensure accurate and safe assembly of the footboard․
It is essential to double-check all connections and bolts to ensure the footboard is securely attached to the crib frame․
The footboard assembly is a crucial step in the overall assembly process‚ and it requires attention to detail and careful execution․
By following the instructions and using the correct tools‚ the footboard can be assembled efficiently and effectively․
The assembled footboard should be sturdy and secure‚ providing a safe and comfortable sleeping environment․

Final Assembly and Inspection
Inspect the crib for stability and ensure all parts are securely attached and tightened properly always and correctly․
Checking the Crib for Stability
To ensure the crib is stable‚ check that all legs are firmly on the ground and the frame is level․
Use a level tool to verify the crib’s stability and make any necessary adjustments to the legs․
Also‚ check that all bolts and screws are tightened securely to prevent any movement or shifting of the crib․
It is essential to follow the manufacturer’s instructions for assembly and inspection to ensure the crib is safe and stable for the child․
Regularly inspect the crib for any signs of wear or damage and make repairs as needed to maintain its stability and safety․
By following these steps‚ you can ensure the crib is stable and secure‚ providing a safe sleeping environment for the child․