
Singer Featherweight 221 Manual: A Comprehensive Guide
Singer‚ established in 1851‚ has consistently produced beloved sewing machines for over 170 years. This manual details the Featherweight 221‚ a pinnacle of their design‚ offering user-friendly features and support.
The Singer 221 Featherweight‚ a marvel of engineering‚ represents a significant chapter in sewing machine history. Introduced during a period of innovation – over 170 years since Isaac Merritt Singer patented the first practical sewing machine in 1851 – it quickly became a favorite among seamstresses and quilters alike. This machine isn’t just a tool; it’s a testament to Singer’s enduring legacy as a trusted brand‚ known globally for its reliability and quality.
This particular model‚ the 221‚ distinguishes itself through its lightweight portability and robust construction. It was designed to be easily transported‚ making it ideal for classes‚ workshops‚ or simply sewing in different locations. Despite its compact size‚ the 221 boasts impressive power and durability‚ capable of handling a wide range of fabrics and sewing tasks.
This manual aims to provide a comprehensive guide to understanding‚ operating‚ and maintaining your Singer 221 Featherweight. Whether you are a seasoned sewer or a beginner‚ this resource will help you unlock the full potential of this iconic machine‚ ensuring years of creative enjoyment. We will explore its features‚ mechanics‚ and provide troubleshooting tips to keep your 221 running smoothly.

Historical Context of the Featherweight
The Singer Featherweight’s story is deeply intertwined with the evolution of home sewing. Emerging from Singer’s 1851 foundation – a legacy spanning over 170 years – it arrived during a period where sewing was transitioning from a laborious task to a more accessible craft. Prior to widespread machine availability‚ sewing was incredibly time-consuming‚ largely impacting daily life.
Singer revolutionized this‚ and the Featherweight‚ specifically‚ catered to a growing demand for portable‚ reliable machines. Its introduction coincided with increased travel and a desire for greater convenience. The machine’s lightweight design allowed seamstresses to easily transport it‚ fostering a sense of independence and enabling sewing beyond the confines of the home.
The Featherweight quickly became a staple in households and sewing circles‚ celebrated for its durability and consistent performance. It wasn’t merely a machine; it was a symbol of progress and empowerment. Its enduring popularity‚ even today‚ speaks volumes about its quality and the innovative spirit of Singer. The machine’s design reflected a commitment to both functionality and aesthetic appeal‚ solidifying its place as a classic.
Key Features and Specifications
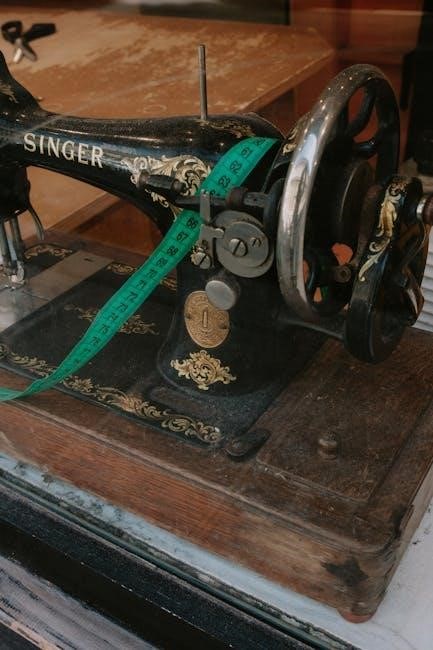
The Singer Featherweight 221 boasts a robust‚ yet remarkably lightweight‚ aluminum body – a defining characteristic contributing to its portability. It’s a direct-drive machine‚ meaning the handwheel is directly connected to the needle‚ providing precise stitch control and quiet operation. This contrasts with belt-driven models.
Key specifications include a maximum stitch length of 2.5mm and a reverse stitch capability‚ essential for securing seams. The machine utilizes a standard 15-class needle system‚ ensuring compatibility with a wide range of needle types for various fabrics. It operates with a horizontal spool pin and features a convenient built-in bobbin winder.
The 221 is designed for straight stitch sewing‚ excelling in tasks like garment construction‚ quilting‚ and general repairs. Its simplicity is a strength; it’s remarkably easy to learn and maintain. Singer’s commitment to quality‚ established over 170 years‚ is evident in its durable construction and reliable performance. The machine’s compact size doesn’t compromise its sewing power.
Distinctive Design Elements
The Singer Featherweight 221’s aesthetic is instantly recognizable‚ embodying Art Deco influences with its sleek lines and elegant curves. Its black and gold decals‚ a hallmark of Singer’s mid-century design‚ add a touch of sophistication. The machine’s compact size and lightweight aluminum construction were revolutionary for its time‚ prioritizing portability without sacrificing durability.
Unlike many contemporary machines‚ the 221 features a minimalist approach‚ focusing on functionality over elaborate ornamentation. The handwheel’s design is both practical and visually appealing‚ contributing to the machine’s overall balanced appearance. The placement of controls – the stitch length dial and reverse lever – is intuitive and easily accessible.
Singer’s dedication to quality is reflected in the machine’s robust build and attention to detail. The Featherweight 221 isn’t merely a sewing machine; it’s a design object‚ celebrated for its timeless style and enduring appeal. It represents a golden age of mechanical engineering and aesthetic refinement.
Mechanical Components Overview
The Singer Featherweight 221 operates on a robust‚ fully rotary hook mechanism‚ ensuring consistent stitch formation and reliability. This differs from oscillating hook systems found in some other machines. The motor‚ though compact‚ delivers ample power for a variety of fabrics. Key components include the handwheel‚ controlling stitch speed‚ and the feed dogs‚ responsible for advancing the fabric.

The machine’s internal gearing is precision-engineered‚ contributing to its smooth operation and longevity. The tension assembly regulates thread tension‚ crucial for balanced stitches. The bobbin case and shuttle work in harmony to create the interlocking stitches. The presser foot‚ easily adjustable‚ applies pressure to the fabric during sewing.
Understanding these core components is vital for maintenance and troubleshooting. The simplicity of the 221’s mechanics makes it relatively easy to repair and maintain‚ even for those with limited technical experience. Its durable construction ensures it can withstand years of regular use.

Setting Up Your Singer 221
Before commencing sewing‚ ensure your Singer Featherweight 221 is placed on a stable‚ level surface. Connect the power cord to a grounded outlet. Begin by raising the presser foot using the presser bar lever; this disengages the feed dogs‚ allowing free movement of the fabric. Next‚ attach the desired presser foot‚ securing it firmly to the presser bar.
Proper lighting is essential for clear visibility. Position a lamp to illuminate your work area adequately. Familiarize yourself with the stitch length and width controls‚ understanding their impact on the final stitch appearance. Ensure the handwheel turns freely‚ indicating no obstructions.
The machine requires proper threading (detailed in a separate section) and bobbin insertion for operation. Always use quality thread appropriate for your fabric type. A well-prepared setup minimizes potential issues and ensures a smooth‚ enjoyable sewing experience with this classic machine.
Threading the Machine – Step-by-Step

Begin with the machine in the upper position‚ needle raised. Place the spool of thread on the spool pin. Guide the thread through the first thread guide‚ then down and around the tension disc – ensuring it seats firmly between the discs for proper tension.
Next‚ bring the thread up and to the left‚ through the take-up lever. Lower the thread into the needle bar thread guide‚ and finally‚ thread the needle from front to back. A needle threader can be helpful for easier threading.
Proper threading is crucial for consistent stitch quality. Incorrect threading can lead to skipped stitches or tension problems. Always double-check that the thread is securely seated in each guide and the tension disc. Refer to the diagrams within this manual for visual assistance; Consistent practice will make this process effortless.
Bobbin Winding and Insertion
To wind the bobbin‚ place the spool of thread on the spool pin and guide the thread through the tension disc. Position the bobbin onto the bobbin winder spindle‚ ensuring it clicks into place. Engage the bobbin winder by sliding the bobbin winder lever to the right.
Depress the foot pedal gently to begin winding. Allow the bobbin to fill evenly‚ stopping before the thread overflows. Disengage the bobbin winder by returning the lever to its original position.
For insertion‚ locate the bobbin case beneath the needle plate. Open the bobbin compartment and insert the wound bobbin‚ ensuring the thread unwinds in the correct direction (clockwise). Guide the thread through the tension spring of the bobbin case. Close the compartment and draw up the bobbin thread by gently turning the handwheel towards you. Proper bobbin winding and insertion are vital for balanced stitches.
Basic Sewing Techniques
Before starting‚ always thread the machine correctly and ensure the bobbin is properly inserted. Practice on scrap fabric to get a feel for the machine’s rhythm. Begin with a straight stitch‚ guiding the fabric smoothly under the presser foot. Maintain a consistent speed‚ letting the machine feed the fabric‚ not forcing it.

For turning corners‚ stop with the needle down in the fabric‚ lift the presser foot‚ pivot the fabric‚ and lower the foot before continuing. Backstitching at the beginning and end of a seam secures the stitches. Experiment with different fabric weights and thread types to understand their impact on stitch quality.
Remember‚ consistent practice is key to mastering basic sewing techniques. Utilize the machine’s features‚ like stitch length adjustment‚ to achieve desired results. A gentle touch and patience will yield beautiful‚ professional-looking seams.
Stitch Selection and Adjustment
The Singer Featherweight 221 primarily excels with a straight stitch‚ its core strength. However‚ understanding stitch length adjustment is crucial for varied projects. A shorter stitch length (lower number) creates a denser‚ more secure seam‚ ideal for delicate fabrics or areas needing extra reinforcement. Conversely‚ a longer stitch length (higher number) is suitable for basting or heavier materials.
Experiment with different stitch lengths on scrap fabric to observe the effect on seam appearance and strength. While the 221 doesn’t offer a wide range of stitch patterns‚ mastering the straight stitch’s versatility is paramount. Proper tension is also vital; imbalances can cause looping or puckering.
Adjust the tension dial incrementally‚ testing after each adjustment until the top and bobbin threads interlock correctly within the fabric. Consistent practice and careful observation will allow you to achieve optimal stitch quality for any project.
Troubleshooting Common Issues
Many perceived Singer 221 malfunctions stem from user error‚ not mechanical failure. Before seeking repair‚ consult available support resources. A common issue is thread breakage‚ often caused by incorrect threading‚ a dull needle‚ or improper tension. Always re-thread the machine carefully‚ ensuring the thread is properly seated in all guides.

Skipped stitches frequently indicate a bent or damaged needle; replace it with a new one of the correct type and size. If the machine jams‚ stop immediately and gently clear any tangled thread or fabric. Avoid forcing the mechanism. Bobbin issues‚ like uneven winding or incorrect insertion‚ can also cause problems.
Ensure the bobbin is wound evenly and inserted correctly into the bobbin case. Regularly cleaning lint and debris from the machine‚ particularly around the bobbin area‚ prevents many issues. Remember to consult the manual for specific guidance.
Maintenance and Cleaning

Regular maintenance is crucial for preserving the Singer 221’s longevity and performance. Frequent lint and debris accumulation‚ particularly around the bobbin area‚ can cause malfunctions. Use a soft brush to gently remove lint after each use. Avoid compressed air‚ as it can push debris deeper into the mechanism.
Periodically‚ a more thorough cleaning is necessary. Disassemble accessible parts‚ following the manual’s instructions‚ and wipe them with a clean‚ dry cloth. Never use water or solvents‚ as these can damage the machine’s finish and internal components. Pay close attention to the feed dogs and surrounding area‚ ensuring they are free of obstructions.
Consistent cleaning prevents issues like skipped stitches and thread jams. Remember‚ a well-maintained Singer 221 will provide years of reliable service. Proper care is an investment in the machine’s future‚ ensuring smooth operation and preventing costly repairs.
Oiling and Lubrication Guide
Proper lubrication is vital for the Singer 221’s smooth operation and longevity. Use only sewing machine oil‚ specifically designed for this purpose; avoid household oils‚ as they can gum up the mechanism. Oil all designated points as illustrated in the manual – typically‚ these include the bobbin case‚ shuttle hook‚ and various moving parts within the machine head.
Apply oil sparingly‚ using a needle oiler for precise application. A few drops are sufficient; over-oiling attracts lint and debris. After oiling‚ operate the machine slowly for a few minutes to distribute the lubricant evenly. Wipe away any excess oil to prevent staining fabric.
Regular oiling‚ ideally every few sewing sessions or after extended use‚ minimizes friction and wear. Neglecting lubrication can lead to increased noise‚ sluggish performance‚ and ultimately‚ mechanical failure. Consistent‚ careful oiling is a small investment that yields significant returns in terms of machine health and sewing enjoyment.
Finding Replacement Parts
Maintaining a Singer 221 often requires replacing worn or damaged parts. Singer Direct Shop is a primary resource for authentic replacement components‚ offering a wide selection online. When ordering‚ ensure accurate part numbers are used – typically a hyphen-less‚ all-numeric or alphanumeric code (e.g.‚ SC130‚ SC131dx). Input keywords in full-width Katakana for specific searches.
Numerous independent sewing machine parts suppliers also specialize in Featherweight components. Online marketplaces like eBay and Etsy can be valuable sources‚ but verify seller reputation and part authenticity. Local sewing machine repair shops frequently stock common parts or can order them on your behalf.
Before purchasing‚ consult the parts list in your manual to identify the correct component. Be mindful of variations within the 221 series; some parts are not universally interchangeable. Careful research and accurate identification are crucial for a successful repair.
Advanced Techniques with the 221
The Singer 221‚ despite its simplicity‚ is capable of surprisingly advanced techniques. Mastering free-motion quilting is achievable with the correct darning foot attachment‚ allowing for intricate designs and personalized stitchwork; Utilizing different presser feet unlocks further potential‚ enabling techniques like gathering‚ ruffling‚ and decorative stitching.
Experimenting with thread weights and types expands creative possibilities. While polyester thread is recommended for general use‚ silk or cotton threads can achieve unique textures and aesthetics. Adjusting stitch length and width‚ combined with careful fabric selection‚ allows for nuanced control over the final result.

Troubleshooting often reveals the root of sewing challenges; consulting online resources and support menus can resolve many issues. Remember‚ many perceived machine faults stem from incorrect usage. Continuous practice and exploration will unlock the full potential of this remarkable machine.
Using Attachments and Accessories
The Singer 221’s versatility is significantly enhanced by its range of available attachments and accessories. A darning foot‚ crucial for free-motion quilting and mending‚ allows the fabric to be moved freely under the needle. Gathering feet facilitate creating ruffles and textured effects‚ while specialized presser feet enable precise techniques like edge stitching.
Accessory options‚ obtainable through Singer Direct Shop‚ include various needles suited for different fabric weights and thread types. Utilizing the correct needle is paramount for achieving clean‚ consistent stitches and preventing damage to both the machine and the material. Consider polyester thread for general sewing‚ but explore silk or cotton for specialized projects.
Properly installing and adjusting these components is key to optimal performance. Refer to the manual for specific instructions and ensure compatibility before use. Exploring these additions unlocks a wider spectrum of sewing possibilities with your Featherweight 221.
Resources and Further Information
For comprehensive support and troubleshooting beyond this manual‚ Singer provides a wealth of online resources. The official Singer website offers frequently asked questions‚ downloadable manuals‚ and helpful video tutorials addressing common issues. Exploring these digital aids can often resolve minor problems independently‚ saving time and potential repair costs.
Additionally‚ authorized Singer retailers‚ such as Tokai Apita Chiba-bashi in Nagoya‚ Japan‚ offer expert advice and genuine replacement parts. These stores can assist with machine maintenance‚ repairs‚ and accessory purchases. When ordering parts‚ ensure accurate model number input (e.g.‚ SC130) and utilize keywords for efficient searching.
Remember that many machine malfunctions stem from user error. Before seeking professional assistance‚ consult the online support menu. Singer’s legacy‚ spanning over 170 years since Isaac Merritt Singer’s first patent in 1851‚ is built on reliable machines and dedicated customer support.